„PF-Technik“
(Schwierigkeitsstufe 1 – AnfängerIn)
Die PF-Technik ist eine von Hobby-Pilzzüchtern entwickelte Methode, um mit einfachsten Mitteln Pilze zu züchten. Im Laufe der Jahrzehnte entstanden mehrere Varianten dieser Zuchttechnik. Diese Anleitung beruht auf unseren Erfahrungen.
Pilze benötigen zum Fruchten ein geeignetes Substrat. Bei der Substratherstellung soll besonders sauber bzw. steril gearbeitet werden, da ansonsten das Substrat leicht durch Schimmel oder Bakterien verunreinigt werden kann. Diese Kontaminationen machen das Substrat und die darauf wachsenden Pilze unbrauchbar.
Die Substrate werden mit Sporen beimpft. In der nächsten Phase besiedelt das Pilzmyzel den "Substratkuchen“. Sobald die Kuchen zur Gänze besiedelt sind, können sie zum Fruchten aufgestellt werden.
Empfohlenes Zubehör:
Microboxen oder Sturzgläser
Messbecher
Vermikulit
Braunes Reismehl
Sporenspritzen (Achtung, nicht alle Sorten wachsen auf PF-Substrat - siehe auch Produktbeschreibungen der Spritzen)
Wasser
Druckkochtopf
Behälter zum Mischen
Substrat mischen
1 L (ca. 700g) Reismehl und 3 L Vermikulit „medium“ gut mischen, dann 1 L Wasser hinzufügen und erneut mischen, bis eine lockere, gleichmäßig feuchte Masse entsteht. Dies ergibt 5 L PF-Substrat für 10 Microboxen (500 ml).
Substrat abfüllen
Das fertig gemischte Substrat mit der Hand in Boxen oder Gläser füllen und mit den Fingern leicht anpressen. Es sollten keine Hohlräume vorhanden sein, aber das Substrat darf auch nicht zu fest angedrückt werden, da ansonsten der Pilz länger zum Besiedeln braucht. Bitte nur bis ca. 1,5 cm unter den Rand befüllen, dann die Oberfläche gleichmäßig ebnen. Den Rand der Boxen/Gläser mit einem sauberen und mit Alkohol oder 10%-iger Chlorlösung angefeuchtetem Tuch gut reinigen und die verbliebenen 1,5 cm des Behälters mit trockenem Vermikulit füllen. Dies verhindert, dass Kontaminationen von außerhalb in das Substrat gelangen. Nun werden die Boxen/Gläser verschlossen. Bei Verwendung von Microboxen den Deckel nur drauflegen, nicht aufpressen, da ansonsten beim Sterilisieren der Druck nicht ausgeglichen wird und die Boxen deformieren werden. Bei Verwndung von Gläsern sollen mit einem kleinen Nagel (2-3 mm Durchmesser) 4 Löcher in den Deckel gemacht werden. Durch diese wird später das Substrat beimpft.
Substrat sterilisieren
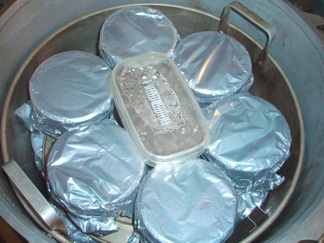
Wir empfehlen die Verwendung eines Druckkochtopfes. In den Topf wird rund 2 bis 3 cm hoch Wasser eingefüllt. Die Boxen/Gläser bitte auf eine Ablage stellen, so dass die Boxen/Gläser nicht mit Wasser in Berührung kommen. Ist der Topf groß genug, kann eine zweite Etage gemacht werden. Die zweite Reihe Boxen/Gläser werden versetzt zur ersten angeordnet. Dadurch kann sich der Dampf gleichmäßiger verteilen.
Erst ab dem Zeitpunkt, an dem die Druckanzeige des Topfes die höchste Stufe (bei Haushalts-Druckkochtöpfen) oder 121°C / 250°F / 15 psi / 1,05 bar (bei professionellen Töpfen) erreicht hat, wird die Sterilisationszeit gemessen – sie beträgt bei unserer PF-Technik 1,5 Stunden. Nach Ablauf der Sterilisationszeit wird der Topf zum Auskühlen an einen sauberen Ort, am besten vor einen HEPA-Filter (steriler Luftstrom), gestellt. Während des Abkühlens kann ein mit Alkohol oder 10%-iger Chlorlösung getränktes Tuch über den Topf gelegt werden, das die in den Topf hineinströmende Luft filtert.
Erst wenn der Druck im Topfes wieder Null erreicht hat, wird der Deckel geöffnet. Sollte der Druck im Topf unter Null gehen, ist das mit Alkohol oder 10%-iger-Chlorlösung getränkte Tuch auf das Eingangsventil zu legen – der Unterdruck führt dazu, dass unsterile Luft in den Topf hineingesogen wird. Durch das Tuch wird die Luft noch einmal gefiltert und verringert das Kontaminationsrisiko. Bitte Hände und Unterarme gründlich reinigen und desinfizieren, eventuell Latexhandschuhe verwenden. Die Substrate werden an einen sauberen Ort vor einen HEPA–Filter oder in die Glove Box gestellt, bis sie abgekühlt sind. Sobald sie auf Raumtemperatur (unter 30°C) abgekühlt sind, können diese weiterverarbeitet werden.
Sobald das frisch sterilisierte Substrat auf Zimmertemperatur (unter 30°C) abgekühlt ist, kann es beimpft werden. Wenn das Substrat nicht sofort verwendet wird, kann es im Kühlschrank (bei +2 bis +4°C) gelagert werden. Bitte die Gläser/Boxen vorher gut verschließen und innerhalb von 4 Wochen verarbeiten.
Wenn Sie fertig sterilisierte PF-Substrate verwenden, starten Sie hier:
Substrat beimpfen
Bitte waschen Sie vor Arbeitsbeginn gründlich Hände, Unter- und Oberarme mit heißem Wasser und Seife. Reinigen Sie nun die Arbeitsfläche und desinfizieren Sie diese mit Flächendesinfektionsmittel. Danach werden Haarnetz, Mundschutz und Handschuhe angelegt. Direkt vor Arbeitsbeginn desinfizieren Sie die Handschuhe mit dem Handdesinfektionsmittel. Einwirkdauer beachten!
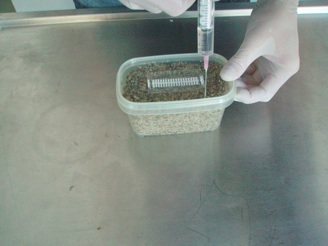
Die Sporenspritze bitte vor dem Beimpfen der Substrate gut schütteln, damit sich die Sporen gleichmäßig im Wasser verteilen. Bei Verwendung von Microboxen kann der Deckel mit der Kanüle durchstochen werden (bitte die Stelle vorher reinigen und desinfizieren). Bei Gläsern wird durch die 4 Löcher im Deckel beimpft.
Bei Verwendung von fertig sterilisierten PF-Substraten bitte vor dem Beimpfen die Klebestreifen von den Löchern entfernen; die Impflöcher müssen nach dem Beimpfen offen bleiben, damit der Pilz atmen kann! Die Verschlusskappe der Kanüle wird erst unmittelbar vor dem Beimpfen entfernt.
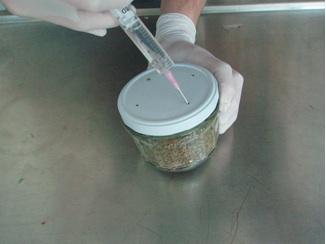
Die Nadel soll nicht berührt werden, damit sie steril bleibt. Nun wird die Nadel durch die Löcher an die Innenseite der Wand der Box/des Glases geführt und die Sporenlösung in das Substrat geimpft. Die Sporenlösung verteilt sich entlang der Wand und erreicht so eine größere Fläche. Dabei ist zu beachten, dass die auf dem Substrat aufliegende Vermikulitschicht nicht beimpft wird. Sie soll trocken bleiben, damit sie ihre Schutzfunktion besser erfüllen kann. Für 1 Box/1 Glas (mit bis zu 500 ml Inhalt) empfehlen wir 1–4 ml Sporenlösung aufgeteilt auf 4 Löcher.
Sollte die Nadel mit den Händen, Gegenständen oder Flächen in Berührung kommen, muss diese wieder sterilisiert werden. Dazu bitte die Spitze der Nadel kurz in eine Flamme (Feuerzeug oder Spiritusbrenner) halten, bis die Spitze der Nadel rot glüht (Achtung: bei Überhitzen der Nadel kann die Nadeleinfassung aus Plastik schmelzen). Danach vollständig abkühlen lassen.
Myzelwachstum
Sobald alle Substrate beimpft sind, werden diese zum Durchwachsen an einem warmen (bis 30°C – optimale Bedingungen können bei den einzelnen Arten nachgelesen werden), dunklen Platz aufgestellt. Die Substrate sind fertig mit Myzel besiedelt, sobald sie komplett weiß sind. Je nach Sorte dauert dies mindestens 2 bis 3 Wochen. Die obersten 1,5 cm, also die trockene Vermikulitschicht ohne Nährstoffe, bleiben unbesiedelt und es wird sich kein Myzel bilden.
Fruchtung
Zum Fruchten werden die fertig besiedelten Myzelkuchen (ist auch nur eine Stelle, ausgenommen die Vermikulitschicht, unbesiedelt, so ist die Wahrscheinlichkeit z. B. eines Schimmelbefalls um vieles höher) mit gewaschenen und desinfizierten Händen aus den Boxen/Gläsern gestürzt. Das trockene, lose Vermikulit auf der Oberseite wird durch leichtes Schütteln oder mit einem geeigneten desinfizierten Gegenstand entfernt. Bitte stellen Sie den Kuchen bei geeigneten Umweltbedingungen für "Primordiabildung" auf. Nachdem die ersten Mini-Pilze (Primordia) erschienen sind, bitte Temperatur und Luftfeuchtigkeit auf "Fruchtung" ändern. Vom Aufstellen bis zum ersten Erscheinen der Mini-Pilze braucht der Pilz je nach Sorte 2 oder mehr Wochen.