Sterilisation of wood substrate
(Level 2 - advanced cultivator)
Most fungi do not develop fruiting bodies on rye grain substrate, that is why an adequate fruiting substrate must be inoculated with the grain spawn. In this chapter we want to introduce a standard substrate suitable for a wide range of wood-inhabiting mushrooms.
Recommended equipment:
Wood chips
Saw dust large
Gypsum
Rye bran
Water
Autoclave bags Unicorn type 14#
Scale
Bag sealer or strong adhesive tape
Sieve
Container for mixing
Pressure cooker
Preparing the substrate
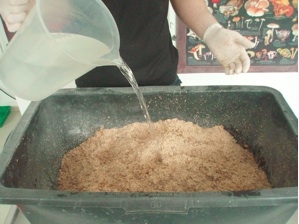
Let the wood chips soak in cold water overnight (12-18h). Use as much water until all the chips are floating. Put the soaked wood chips in to a sieve and let drain for around 15 minutes. In the meantime put all dry ingredients (sawdust, rye brain and gypsum) into the mixing container and mix very well. After the dry ingredients are mixed add the soaked wood chips and mix the substrate again. Finally add the water and mix it again very well.
Mixing proportion
For filling of 1 autoclave bag (please use original Unicorn bags Type 14# for wood substrates) you will need 368g wood chips, 735 g saw dust large, 31 g gypsum, 200 g rye bran and 950 ml water. This will produce approximately 2,5 kg substrate. Sterilisation time: about 3 – 4 hours.
Filling bags with substrate
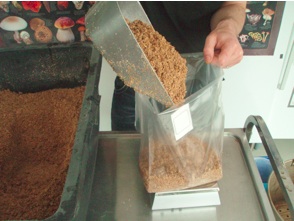
Roll down the autoclave bag about 10 cm and pour in 2.5 kg of the wood substrate mixture. Be careful not to spill any substrate on the upper regions of the bag (in case you did, clean the bag with a wet piece of cloth). Then wrap the bag twice.
Sterilising the substrate
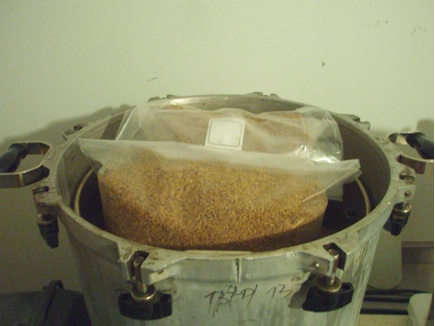
A pressure cooker is used for sterilising. Overlying a 2-3 centimetre water level at the bottom of the cooker, a separating insert keeps the bags above the water line. Assure yourself that there is no contact between water and the bags, decant some water if necessary (mind the manufacturer's instructions of your pressure cooker!). Now load the bags. If the cooker is big enough you can make two levels of bags. Place the upper layer on a separating tray between the levels. This ensures that the steam gets evenly distributed.
Get the lid locked and put the cooker on a hotplate and start the heating. Wait until you can see steam leaking out, then close the outlet. Count the sterilisation time from the moment the pressure gauge reaches its highest stage (for household pressure cookers). If you've got a professional pressure steriliser at your disposal sterilise at 121°C/ 250°F/ 15 psi/ 1.05 bar.
Once the sterilisation time has passed the cooker must cool down in a clean place, preferably in front of a HEPA–filter (sterile air flow). If working without laminar flow hood put a clean piece of cloth/paper, soaked with 70 % alcohol or a 10 % chlorine solution over the cooker outlet during the cooling process to filter the air streaming into the pot while pressure equalisation.
After the cooker is fully depressurised, open the lid. If you work with jars close the lid of the jars fast and tight to minimise contamination risk. The bags should cool down to room temperature in front of a HEPA-filter or in a Glove Box. As soon as the substrate has cooled down below 30°C/ 86°F, it is ready for inoculation. If you want to continue at a later date, close the bags tightly, store the substrates in the refrigerator (35.6-39.2°F, 2-4°C) and use them within 4 weeks.
References:
„Mycelium running/ How mushrooms can help save the world“, Paul Stamets; Ten Speed Press, Berkeley/Toronto;
„The Mushroom Cultivator: A Practical Guide to Growing Mushrooms at Home", Paul Stamets, Agarikon Press; First Edition (December 1983);
„Growing Gourmet and Medicinal Mushrooms”, Paul Stamets, Ten Speed Press, Berkeley/Toronto;